Chrysler taught its transmissions how to learn. ZF made sure they understood what they were learning — and why.
The Evolution of Clutch Adaptation
When the 845RE and 8HP70 were introduced in the Ram lineup in 2013, they brought an 8-speed transmission with a new clutch-apply adaptation. Back in the A604 days, clutch control was simple by today’s standards; apply rate was managed through solenoid modulation, and clutch release rate was handled by separator plate orifices. At the time, this was revolutionary, but it was also limited because fine-tuning controls weren’t available. Line pressure was not controlled; the Pressure Regulator system was preset to produce a specific pressure depending on the selected and commanded gear.
Chrysler’s Clutch Volume Index (CVI) was revolutionary in that the system learned and adapted where no transmission had been before. By monitoring input speed, engine speed, and TPS, it could calculate the volume of fluid needed to engage a clutch. Fluid temperature was originally calculated because no transmission fluid temperature sensor was installed in those first units. Using engine runtime and temperature, the system estimated the fluid temperature and made changes to the clutch based on that calculation.

As later models obtained pressure control, the CVI system could only correct one variable, time. And it did this while assuming pressure behaved consistently. With constant pressure, the clutch apply was timed; that is, the volume required to achieve clutch engagement was very well timed. But transmissions never remain constant. Age and use mean wear and tear of components.
The CVI system was implemented in the RFE models with the same limitation, only with a change in the apply time. Line pressure worked independently of shift apply, meant to counter increases or decreases in input torque.
ZF’s Shift: From Estimation to Control
When the ZF 8-speed models came into the picture, the existing CVI system wasn’t refined enough to achieve their goals. Instead, the philosophy of adaptation was replaced. Instead of asking “how long did it take to apply the clutch,” the question became two parts – “How much pressure did it need? And how long did it take to get there?” This gives us two categories – Pressure and Time. So, they built a system that adapts both independently and continuously.
2 categories – 4 parameters
ZF adaptation consists of 4 key parameters, divided into two groups: Pressure and Time.
Pressure Adaptation
- Clutch Filling Pressure – Learned baseline pressure.
- Fast Filling Counter – Pressure correction activity.
Time Adaptation
- Clutch Filling Time – Time required to fill clutch.
- Clutch Filling Counter – Time correction activity.
Fast Fill represents the initial pressure correction activity, used to quickly move the apply pressure toward its target.
Clutch Fill Pressure is the learned baseline pressure required to move the piston into contact with the frictions. It fine-tunes the apply once the pressure is close.
Clutch Filling Time is the time required to fill the clutch cavity. A high value could indicate increased clutch clearances, worn components, leaks in the applying hydraulics, or even fluid drain back, where air has been introduced into the clutch circuit.
Clutch Filling Counter tells us how often the clutch filling time had to be corrected. A higher count here shows the system has been busy compensating for the changes that affected clutch filling time.
ZF Adaptation is like Fuel Trims
If you understand Fuel Trim, then you already understand the ZF adaptation process (Figure 1).
 The terminology is different, but how the two systems work is very similar. And if you’re not familiar with fuel trims, then here’s a brief description of how they work. On the engine side, the O2 sensor reads the exhaust stream. If it sees lean, then the STFT adds fuel, and over time, that correction becomes the LTFT. From the LTFT baseline, any fuel corrections then start at that value.
In the transmission, a clutch is applied, and the TCM watches the input/output speed response. If the clutch applies too softly, the system increases pressure-correction activity (Fast Filling Counter) to adjust the apply rate. When this change stabilizes, the Clutch Filling Pressure will change to reflect a new baseline.
Reading the Data on Your Scan Tool
Now that you understand how each of the 4 parameters works to affect change on clutch applications, you can use this information to understand the health of a clutch and its hydraulic apply.
Fast Filling Counter: Doesn’t show how much pressure changes; it shows how often the system changes it. High or unstable numbers indicate the system is still searching.
Clutch Filling Pressure: This is the baseline pressure. It will change slowly over time due to wear, but frequent changes can result from clutch wear, leakage, fluid condition, or air in the system.
Clutch Filling Time: How long it took to apply the clutch. If this value changes, you are looking at increased clearance, worn components, or clutch drain back.
Clutch Filling Counter: Shows how often filling time had to be corrected. High counts point to instability in volume control.
In short, the counters tell you if it’s struggling. Values tell you where it landed.
What causes adaptation to change?
A good working transmission should have stable adaptation values, and counts will be in the 5 to 12 range. Moving values and increasing counts indicate the system is correcting for a fault.
Common causes:
- Internal leakage
- Seal wear
- Air in the clutch circuit
- Fluid condition or viscosity issues
- Clutch wear or damage
- Drain back, introducing air into the circuit.
Quick Learn: The System Reset
The Quick Learn process establishes an initial baseline for clutch fill values. This sets a starting pressure strategy and prepares the system for adaptive drive learning. What Quick Learn does not do is fully adapt the transmission, and it most certainly does not replace road testing. You should never release a vehicle to a customer without completing the road test.
Quick Learn should be performed any time there has been:
- An overhaul of the transmission (using the original valve body and TCM).
- Transmission replacement
- Valve body/TCM replacement
For post-repair, we begin the adaptation process by first driving the vehicle briefly, ensuring all clutches have engaged at least twice. This will help ensure all air has been purged from the clutch apply circuits. Drive until the transmission temperature has reached 131°F. On this drive, refrain from using heavier throttle settings; you don’t want to start off by damaging the frictions.
If you’re reusing the TCM, then you’ll need to reset the adaptive values. Once the adaptive values have been reset (if needed), activate the Quick Learn routine. Follow the on-screen instructions.
Once that’s completed, you are ready for the Adaptive Road Test. For ideal conditions, you need a road that has.
- Flat or slight grade. Avoid hills and steep grades.
- Minimal traffic interruptions. Try to pick a route that has few traffic lights.
- Avoid construction or high traffic areas.
When driving, you will want to:
- Use light to moderate throttle.
- Maintain steady acceleration. Avoid rapid or sudden torque input changes.
- Allow full shift sequence, 1-8 and 8-1.
- Repeat these shift sequences.
Driving on a rough road, stop-and-go traffic, and frequent traffic lights can have a direct impact on the adaptation because it can affect the torque output of the engine. Frequent changes to torque input will cause adaptation to pause, make incorrect calculations, increase the time to adapt, or even abort the relearn. The key here is to maintain a steady rate of acceleration, avoid sudden stops, and be consistent with each upshift and downshift sequence.
There are two procedures for relearning the driven adaptation process: Fast Filling Adaptation and Standard Clutch Filling Adaptation.
Fast Filling Adaptation
Fast-fill adaptation occurs during the clutch apply; adhering to the road and driving guidelines will reduce the time needed to complete this step. First, prepare your scan tool to display the following.
- Transmission Oil Temperature
- Torque
- Turbine (Input) Speed Sensor RPM
- Clutch Filling Counter for each of the 5 clutches.
The minimum temperature to begin the Fast Filling adaptation is 86°F (30°C). If needed, you can drive the vehicle until the temperature comes up. At this point, we are ready to perform our basic adaptation drive cycle.
- Clear any DTC’s if present.
- Make sure the transmission fluid temperature is above 86°F (30°C)
- Stop the vehicle if it’s in motion.
- Accelerate smoothly to 40-50 mph (64-80km/h), allowing the transmission to upshift to 7th gear.
- Keep the engine RPM between 1250 and 2000 RPM, and the input torque between 74 and 110 ft-lbs (100-150 Nm).
- Once 7th gear is obtained, you can release the throttle and coast until the transmission makes a 6-5 downshift.
- Repeat these steps until the Filling Counters for each clutch match the transmission model in the table in Figure 2. These targets are typical field results and may vary slightly depending on model and calibration.

Once you’ve hit the appropriate counters (Figure 2), the transmission should be shifting smoothly and consistently throughout the gear range. If you do find that one clutch or gear change is not quite there, has a flare, or is firmer than the others, we can address that condition without repeating the fast fill processes.
 Standard Clutch Filling Adaptation Procedure

The Standard Clutch Filling Adaptation occurs when the transmission is in steady state, that is, staying in a single gear, not upshifting nor downshifting. Using the clutch apply chart to see which clutches are applying and releasing during a questionable shift, it is possible to get more adaptation on both clutches (Figure 3).
Here’s an example: You find the 3-4 shift is firmer than the rest of the shifts. Looking at the clutch apply chart, we see the D clutch is applying, and the C clutch is releasing. To improve the 3-4 shift feel, you will need to learn both clutches, as one is the applying clutch and one is the release. Using the Steady State chart, you can find the gear and conditions that each clutch will adapt to. (Figure 4)
 Here’s how the steady state adaptation drive procedure works.
Clear DTCs, if any present.
Set up the scan tool to display the following PIDs.
- Transmission Oil Temperature
- Torque
- Turbine (Input) Speed Sensor RPM
- Clutch Filling Counter for each of the 5 clutches.
The transmission temperature must be at least 122° F (50°C). If it’s below this temperature, then drive the vehicle to warm the transmission. Note that if the transmission temperature goes over 212°F (100°C), then the adaptation will abort.
If the transmission fluid temperature is between 122°F (50 °C) and 212°F (100°C), stop the vehicle.
Using paddle shifters or the Gear +/- buttons, hold the transmission in the desired gear as shown in figure 4. Remember, you must relearn both the applying and releasing clutches.
In our example of a firm 3-4 shift, we will start with learning the D clutch by doing the following:
- Select 3rd gear and drive between 20- 35 mph (32-56 km/h)
- Keep the turbine (Input) speed sensor between 950 – 1750 RPM
- Keep the torque between 18-133 ft/lbs (25-180 Nm)
Once you see the D Clutch Fast Filling counter change by 1 count, you can then proceed to the C clutch.
 The C clutch relearn is performed in 4th gear, so manually select 4th and maintain the following readings:
- Drive between 20-35 mph (32-56 km/h)
- Keep the turbine (Input) speed sensor between 950 – 1750 RPM
- Keep the torque between 18-133 ft/lbs (25-180 Nm)
Again, once the C Clutch Fast Filling Counter changes by 1 count, the relearn is complete. If the shift is still objectionable, repeat the steps until the Fast Filling Counter changes again.
Be aware that there is no 1st or 2nd gear adaptation due to varying engine torque, so relearning the clutches in those gears is performed at higher gears, where torque can be steady and within limits.
What to look for on a seasoned transmission to determine if a clutch is good or bad is;
- Clutch filling pressure between -300 and +600 mbar.
- Clutch filling counter needs at least 2 counts. A 0 count indicates a reset has been performed.
- Clutch filling time -120 to +120 milliseconds
- Clutch Fast filling counter a minimum of 4. 0 indicates a reset and value not learned.
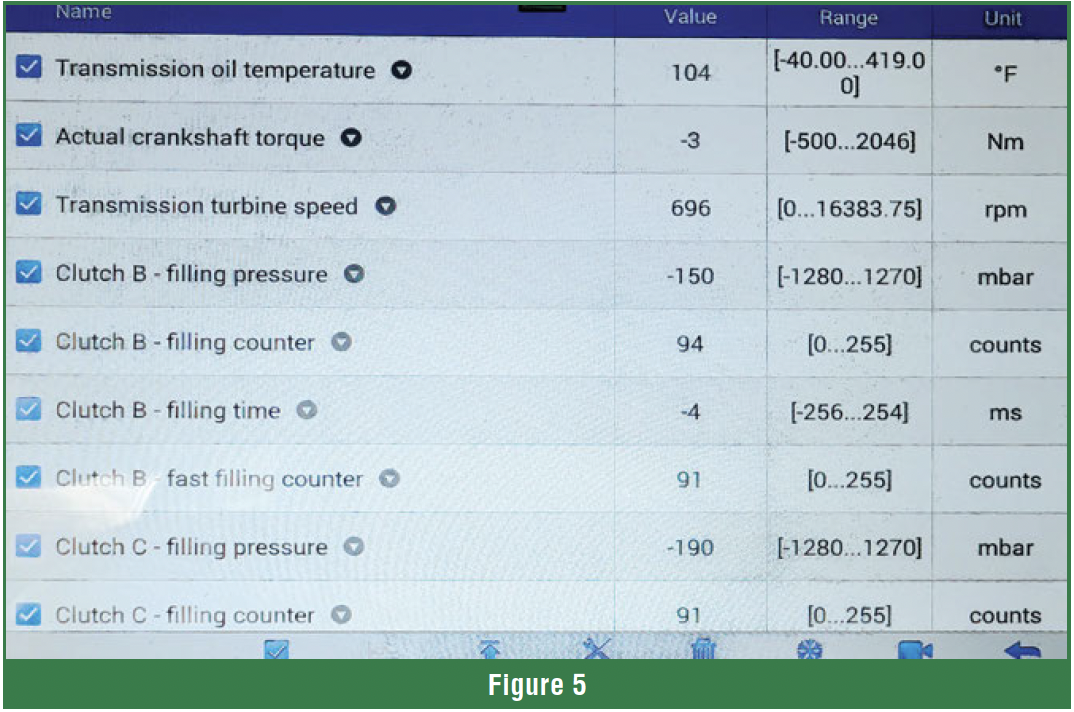
This screenshot in Figure 5 is from a 2019 Jeep with the factory transmission. The counters show how often the baseline pressure had to be adjusted, in 118K miles, and the filling pressure is well within the good working range. These clutches have minimal wear. These numbers show a healthy transmission.
ZF didn’t just build a transmission that adapts; it built one that continuously manages change. Understanding how this system learns can help avoid unnecessary parts replacement or misdiagnosis, and most importantly, make this transmission less frustrating to work on. The more confident you are in understanding how it works, the better your experience will be on this transmission. You might even find it fun.