In this issue of Keep Those Trannys Rolling, we are going to look at a 2015 Ford F250 truck with a delayed drive engagement concern that sometimes fell out of gear while coming to a stop. This 2015 Ford F250 was equipped with a 6.7L diesel engine and a 6R140 TorqShift transmission.
We first learned about this 2015 Ford F250 when it rolled into our shop, and the customer asked us to take a quick look. According to the customer, he experienced delayed drive engagement and sometimes fell out of gear while coming to a stop. While the customer waited in our customer lounge, we pulled the vehicle into a bay for an initial inspection.
Initial Inspection
With the F250 parked in the bay, we began our initial inspection. We performed a walk-around inspection, looking for scratches, dents, or other visual concerns. The dents and scratches made it clear this was a work vehicle. We inspected under the hood. We checked hoses, belts, and wiring harnesses. We checked the fluid levels and replenished them as needed. We lifted the vehicle on the rack to perform an under-vehicle inspection. During the inspection, we checked the underside of the engine and transmission, then completed our under-vehicle inspection with a visual check of the exhaust and fuel system. Everything seemed okay on the underside of the vehicle. With the vehicle inspection completed, it was time to take a closer look at this F250.
A Closer Look
With the initial vehicle inspection completed, it was time to take a closer look at this F250. We started by connecting our scan tool to the vehicle’s Data Link Connector (DLC) to see if any codes were stored in the computer modules. No codes were stored in any of the modules. We connected a pressure gauge to the transmission line pressure tap to monitor transmission line pressure while driving. With the scan tool connected to the DLC and the pressure gauge connected to the transmission line pressure tap, it was time to head out for our initial test drive to see if we could duplicate the customer’s concerns.
Duplicate to Diagnose
With the scan tool connected to the DLC and the pressure gauge connected to the transmission line pressure port, we headed out for our initial test drive. During start-up, we monitored the transmission line pressure. The transmission line pressure in “Park” was within specification at 90 psi. As we engaged “Drive”, we noticed a 5 to 10 second delay before the transmission engaged into Drive. The pressure gauge remained steady at 90 psi during the delayed engagement. We did not notice any delayed reverse engagement at this time. During the test drive, we drove through parking lots and city streets. We drove on the freeway at speeds of up to 70 mph. During the test drive, the transmission worked flawlessly. When we exited the freeway and stopped, the transmission seemed to fall out of gear. We glanced at the pressure gauge and saw no pressure drop when the transmission fell out of gear. With the delayed engagement and falling-out-of-gear concerns duplicated, it was time to head back to the shop.
Back at the Shop
With the delayed engagement and falling out of gear concerns duplicated, it was time to diagnose them. We informed the customer that we needed more time to diagnose the delayed engagement & falling out of gear concern, so we gave him a ride home while we continued the diagnostic process. We rechecked the computer system for codes. Again, no codes were set in any of the modules. We reviewed the pressure gauge readings and determined we were not looking at a pressure problem when the transmission experienced delayed engagement and falling out of gear at stops. We referred to the solenoid and component apply charts and determined that shift solenoid A (SSA), the forward (1,2,3,4) clutch, low/reverse (1, R) clutch, and low OWC were being used to engage Drive. With these components being identified, it was time to take a closer look.
A Closer Look
After identifying the components used to engage Drive, we removed the transmission pan and inspected the pan and fluid. The fluid was clean with no debris in the pan. We removed the valve body assembly to inspect shift solenoid A (SSA) and the forward (1,2,3,4) clutch latch valve, and the forward clutch regulator valves and bores for wear. We flow-tested shift solenoid A (SSA) and found the solenoid was working properly. We vacuum checked the forward clutch latch and regulator valves and bores for wear. They both passed with more than 18 in. of vacuum. With shift solenoid A (SSA) and the valve body passing inspection, we turned our attention to the internal transmission components.
Checking Internal Components
With shift solenoid A (SSA) and the valve body passing inspection, we turned our attention to the internal transmission components. We started checking the internal components by air-checking each component at 45 psi of regulated air pressure. We air-checked the low/reverse clutch circuit, intermediate clutch circuit, direct clutch circuit, and overdrive clutch circuit (Figure 1). 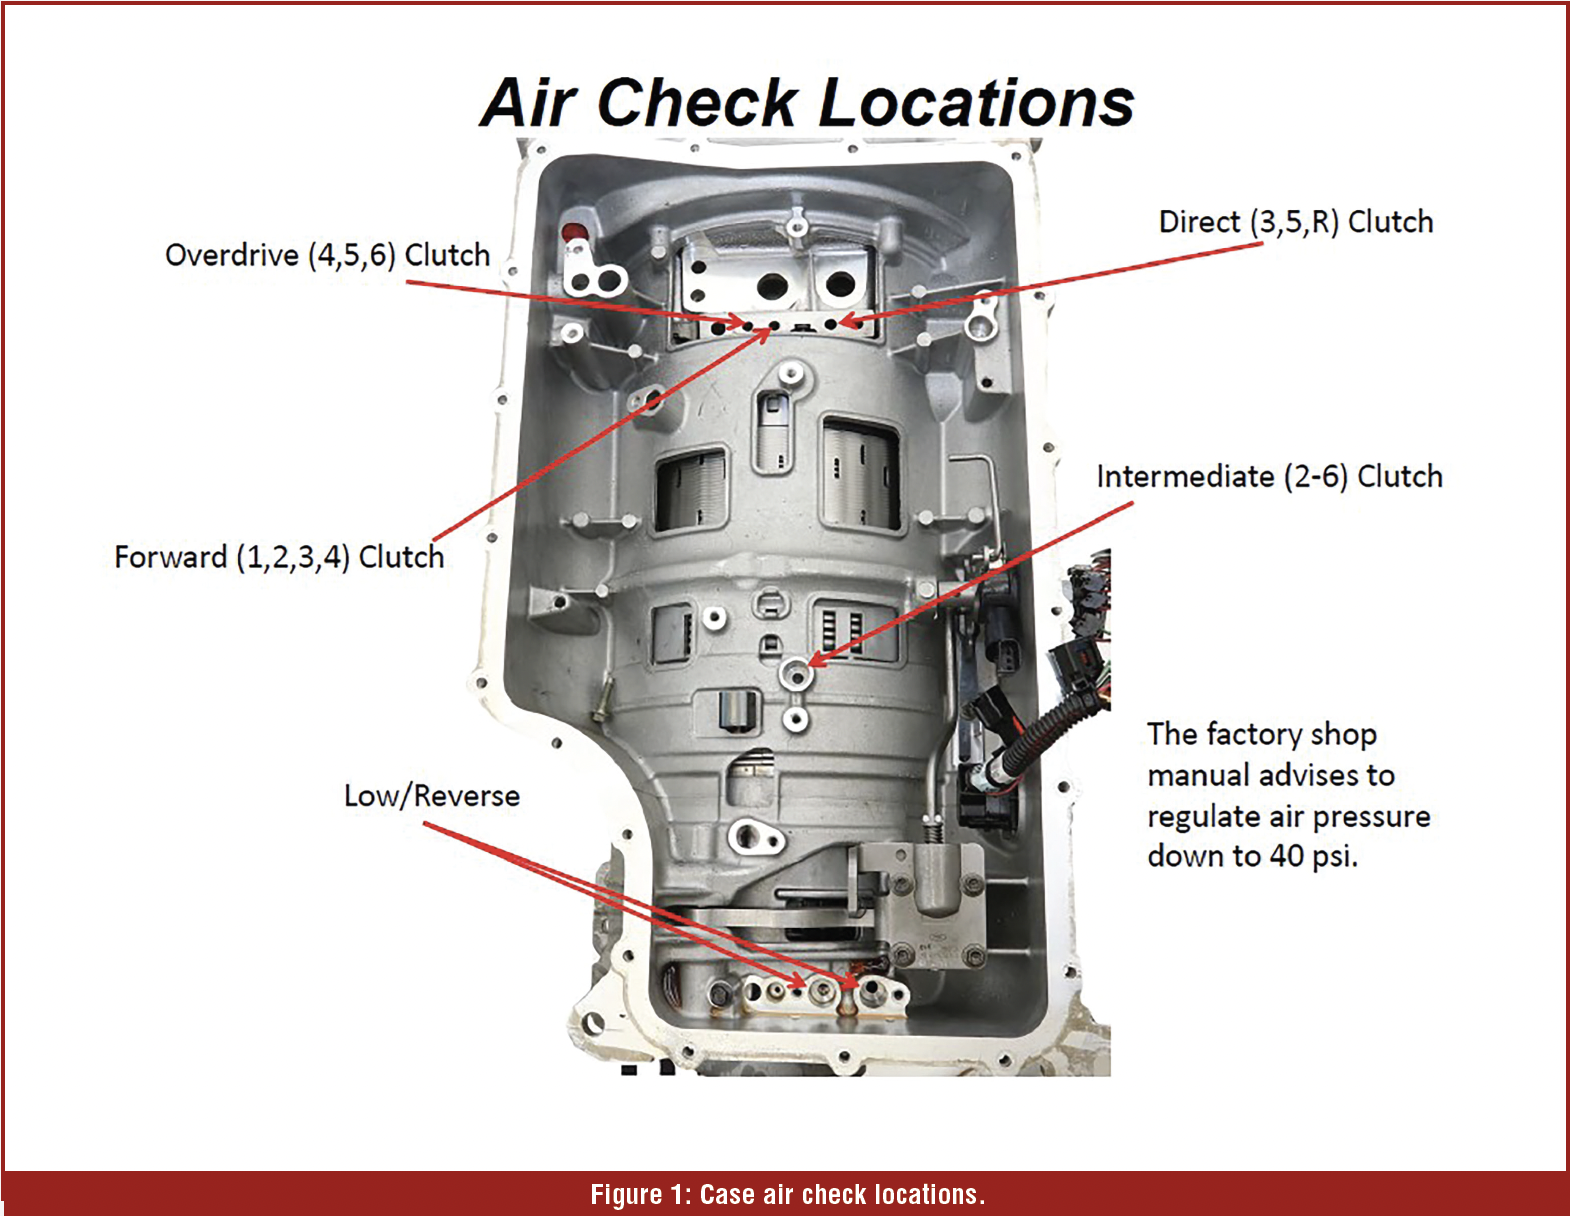 We air-checked and applied each clutch circuit at 45 psi. When we attempted to air check the forward clutch circuit at 45 psi of regulated air pressure, the forward clutch would not apply. We then increased the air pressure by 10 psi for each subsequent forward clutch circuit air check. After several increases and attempts, we finally applied the forward clutch at 110 psi of regulated air pressure. This indicated the forward clutch circuit was leaking pressure. With the forward clutch circuit leaking pressure internally, it was time to disassemble the transmission and inspect the forward clutch circuit.
Forward Clutch Circuit Inspection
After confirming a leak in the forward clutch circuit, we removed the transmission assembly from the vehicle and began disassembling it. With the transmission disassembled on the bench, we inspected the forward clutch circuit components. We checked the forward clutch hub splines for damage. They were okay. We air-checked the forward clutch hub and found air leaking internally from the forward clutch pack. We disassembled the forward clutch hub clutch pack. During the forward clutch hub pack disassembly, we found the clutches and steels were slightly discolored. With the clutch pack disassembled, we filled the clutch hub with fluid and air-checked the forward clutch hub again. 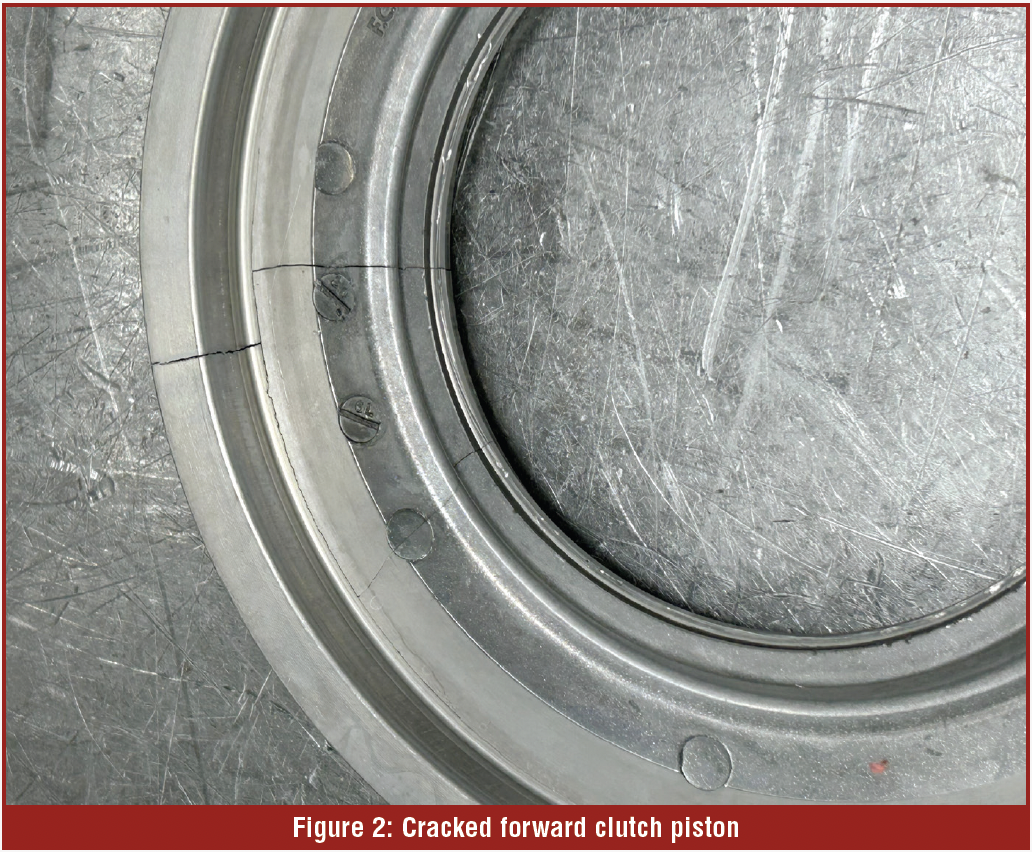 During the second air check, we could see air leaking through the forward clutch hub piston. After identifying the piston leak in the forward clutch hub, we disassembled the clutch hub to inspect the forward clutch piston. With the forward clutch piston removed from the clutch hub, we used our eagle eye (magnifying glass) and found the forward clutch piston was cracked (Figure 2). We cleaned the forward clutch hub, replaced the forward clutch piston, seals, clutches, and steels, and prepared to reassemble the transmission.
Reassembling the Transmission
With the forward clutch hub reassembled, we cleaned up the remaining components and started reassembling the transmission. After assembling the individual components and installing them into the case, we installed the pump assembly. With the case fully assembled, we air-checked each clutch circuit again at 45 psi of regulated air pressure. We applied each clutch circuit at 45 psi of regulated air pressure. We installed the valve body, filter assembly, and transmission pan. With the transmission reassembled, it was time to install the transmission assembly.
Installing Transmission Assembly
With the transmission reassembled, we started installing the transmission assembly back into the truck. Since this is a two-wheel-drive vehicle, the installation process was pretty straightforward. After installing the transmission assembly, we filled the transmission with MERCON LV fluid and started the vehicle. After refilling the transmission to the proper level and checking for leaks, it was time for our final test drive.
Final Test Drive
With the transmission refilled to the proper level, we headed out for our final test drive. Again, during the test drive, we drove through parking lots and city streets. We drove on the freeway at speeds of up to 70 mph. During the test drive, the transmission worked perfectly. When we exited the freeway and stopped, the transmission did not fall out of gear. With the transmission working perfectly, we headed back to the shop to complete our repair.
With the F250 back at the shop, we checked all fluid levels and verified that they were at the correct levels. We rechecked for leaks, and there were none. With the customer’s permission, we kept the vehicle for a couple of days, using it as a parts-running truck, and the transmission worked flawlessly, no delayed forward engagements and no falling out of gear at stops.
Well, there you have it. With a good air check and an eagle eye, you too can conquer those cracked pistons and keep those trannys rolling down the road.