There was an iconic scene in the 1980’s horror movie called Poltergeist where a child is in front of a television screen that was left on but not tuned to a channel. After a while, she announced to her family, ‘they’re here!’ In this case, she was referring to the arrival of the undead spirits. No doubt this is how some of us feel about the appearance of the first 8L90 transmission at our shop!
When we introduced the 8L90 transmission in 2015, it seemed like a transmission that we wouldn’t have to worry about for a long time outside of the dealership setting. Well, here we are seven years later, and now we are seeing these units show up at transmission facilities across the country. Unfortunately, while programming updates seem to cure most subtle shift and torque converter clutch control issues, we are now witnessing internal failures. Just in case you have not experienced one of these units firsthand yet, let’s look at some areas that are common failure issues.

 FIRST THINGS FIRST!
When one of these units comes into our shop for an initial diagnosis, always remember that the vehicle is the best dyno you can have, so use it! Focus on complete powertrain diagnosis. So that there’s no misunderstanding, here is a list of things to do first:
- Scan all modules for all codes and address them first.
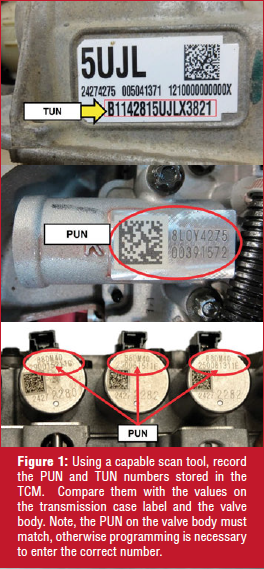
- Using your scan tool, ensure the TUN and PUN match for your application (Figure 1)
- Check the battery and charging system for issues and correct them.
- Inspect, clean, and secure all critical power and ground contacts from the battery and beyond.
- DO NOT clear the transmission adaptive tables!
- Verify the transmission fluid temperature (TFT), intake air temperature (IAT), and coolant temperature (CTS) sensors are working correctly.
- Check the fluid level and condition.
- Verify the latest updated fluid is used.
This will be your benchmark starting point. Here we can test drive the vehicle to verify the customer’s complaint. In some cases, the vehicle may come in with a no-move condition.
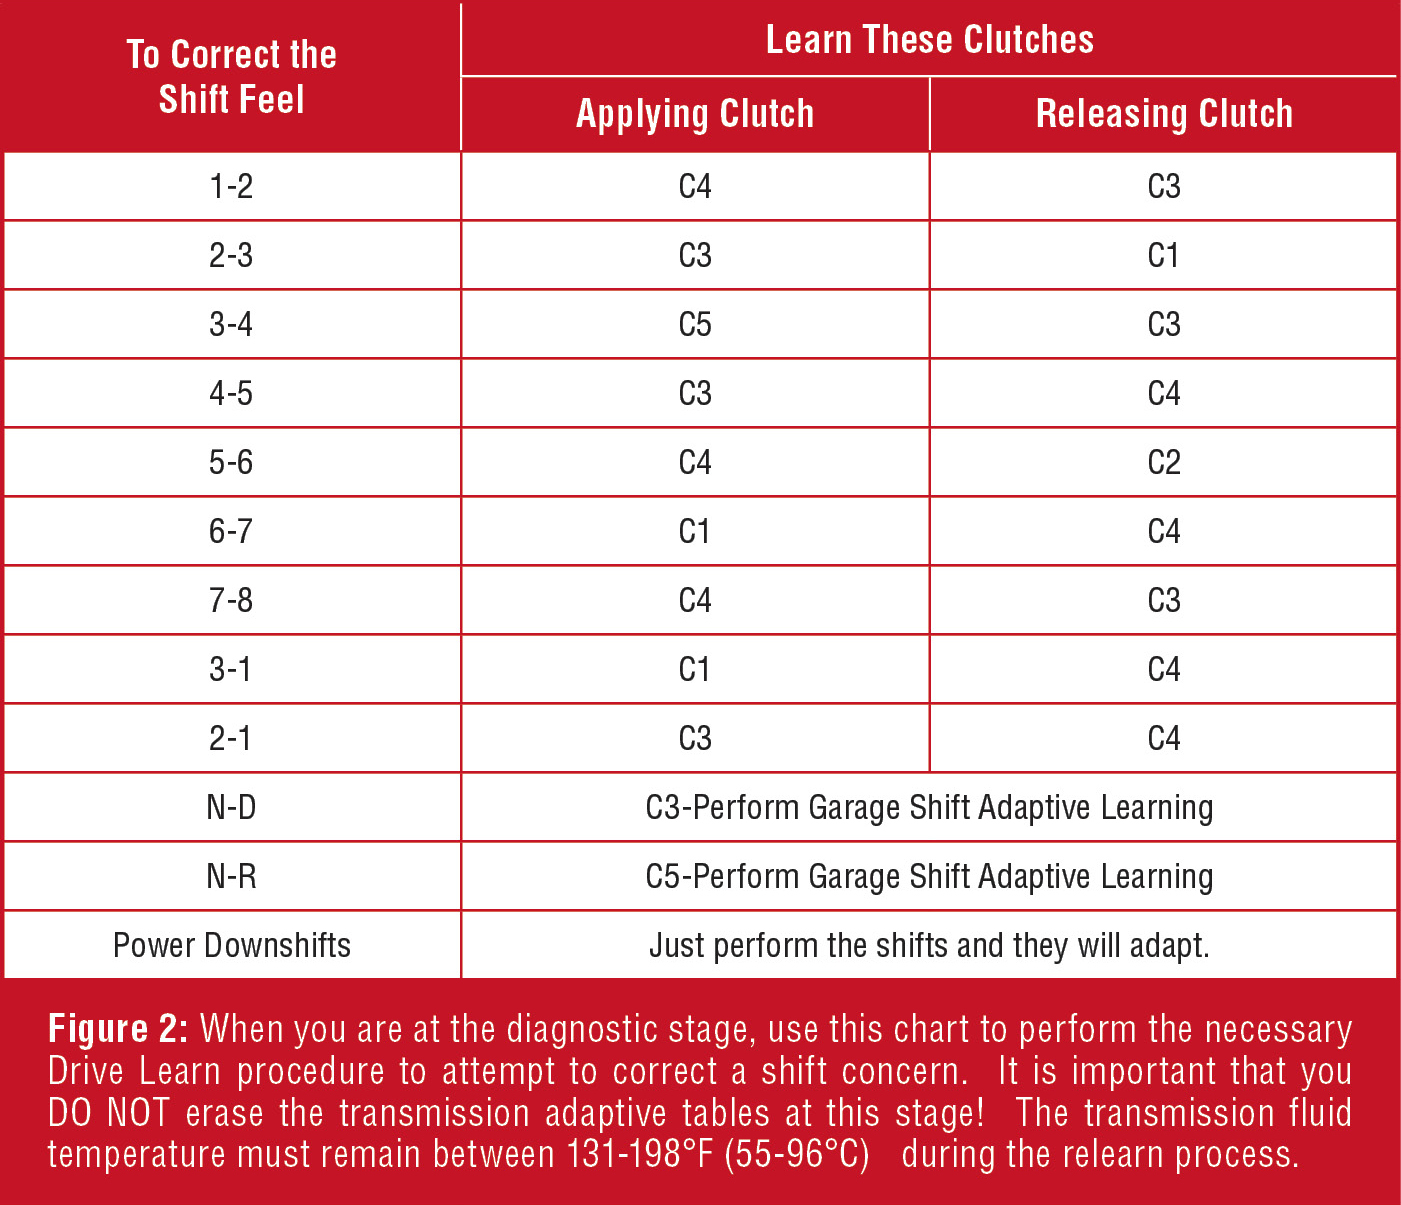
If we are dealing with a shift quality complaint, identify the shift transitions of concern. Follow the Drive Learn procedures to correct the issue (Figure 2). Note, to initialize the Drive Learn process, the Abbreviated Coast Down Shift adaptive must be performed first as follows:
Abbreviated Coast Down Shift Adaptive Learning:
- Lightly accelerate to 65 mph (105 km/h) and coast to 25 mph (40 km/h) (light braking can be applied).
- Repeat 10 times.
This procedure will enable the clutch apply adaptive learning for the C2 and C3. This only needs to be performed once per drive cycle to enable the adaptive learning for all subsequent C2 and C3 learning maneuvers. Failure to perform this procedure will result in no learning of these clutches.
To Learn C1 (1-3-5-6-7) Clutch:
- Shift the transmission into 4th gear with the PRNDM in the M position.
- Start a slow acceleration at about 1000 rpm and maintain the slow acceleration until you reach about 1650 rpm.
- Once you reach 1650 rpm, go back down to 1000 rpm and repeat the slow acceleration up to 1650 rpm.
Repeat this a few times and retry the complaint shift to see if it has improved to an acceptable level. If not, continue this slow acceleration procedure until the complaint shift improves.
To Learn C2 (4-5-6-7-8-Reverse) Clutch:
- Shift the transmission into 3rd gear with the PRNDM in the M position.
- Start a slow acceleration at about 1000 rpm and maintain the slow acceleration until you reach about 2500 rpm.
Once you reach 2500 rpm, go back down to 1000 rpm and repeat the slow acceleration up to 2500 rpm. Repeat this a few times and retry the complaint shift to see if it has improved to an acceptable level. If not, continue this slow acceleration procedure until the complaint shift improves.
To Learn C3 (2-3-4-6-8) Clutch:
- Shift the transmission into 7th gear with the PRNDM in the M position. Obtain an engine speed between 1000 and 1750 rpm.
- Maintain this condition for a total of about 5 miles (8 km).
Cruise control may be used and has resulted in faster learning of the clutch values. Try the complaint shift to see if it has improved to an acceptable level. If not, continue operating in this speed range until the complaint shift improves.
To Learn C4 (1-2-7-8-Reverse) Clutch:
- Shift the transmission into 6th gear with the PRNDM in the M position.
- Obtain an engine speed between 1000 and 1750 rpm. Maintain this condition for a total of about 5 miles (8 km).
Cruise control may be used and has resulted in faster learning of the clutch values. Try the complaint shift to see if it has improved to an acceptable level. If not, continue operating in this speed range until the complaint shift improves.
To Learn C5 (1-2-3-4-5-Reverse) Clutch:
- Shift the transmission into 8th gear with the PRNDM in the M position.
- Obtain an engine speed between 1000 and 1750 rpm. Maintain this condition for a total of about 5 miles (8 km).
Cruise control may be used and has resulted in faster learning of the clutch values. Try the complaint shift to see if it has improved to an acceptable level. If not, continue operating in this speed range until the complaint shift improves.
Power Downshift Adaptive Learning:
- Starting with the vehicle operation in 8th gear, slowly apply pressure to the accelerator pedal until downshift occurs.
- Repeat as necessary in each gear.
This procedure will learn the off-going clutch adapts for desired power downshift control.
Garage Shift Adaptive Learning:
- Perform abbreviated coast downshift adaptive learning procedure.
- With the vehicle at a stop, hold your foot on the brake pedal and move the shifter from Neutral to Drive and Neutral to Reverse.
- Repeat as necessary until desired shift quality is achieved.
This procedure will learn the C1 (1- 3-5-6-7), and the C2 (4-5-6-7-8-Reverse) oncoming clutch adapts. If the complaint remains, inspect the sump for debris. This will determine the direction we head in for repair.

VALVE BODY ISSUES
After everything possible was performed on the TCM programming and relearn side, the next area of concern is the valve body. Before going much further, do your due diligence and check the PUN on the valve body to ensure that it is not different than what was observed on the scan tool.
Sticking valves and solenoids are common with this unit. Issues with the 1-2 shift quality have been narrowed down to SSB sticking and/ or the ‘B’ control valve line up sticking. While it is difficult to determine if a specific solenoid is failing due to mechanical performance issues on the bench, here is where creativity can help.
You can swap a suspect solenoid from one position on the valve body with an equivalent for test purposes only. Keep in mind, you MUST keep track of any change that you make here, so make sure that you mark the solenoids! You are focusing on the fact that if a solenoid is mechanically bad, you need to purchase an entire valve body with the solenoids. If issues clear up and/or change relative to the position the suspect solenoid was placed, you can be assured that a mechanical solenoid performance failure is your concern. If the issues remain relatively the same, look deeper into the valve body for concerns. Note, always swap solenoids back to their original position after testing!

Valve body bore wear is another issue. Shift quality issues that linger after drive learn attempts fail to resolve the concerns are often a sign that wear may be present (Figure 3). Check for wear in all accumulator and valve regulator bores. These are the areas most susceptible to wear. There are a few aftermarket fixes available. For severe duty use and high mileage applications where wear is observed, it is recommended to replace the valve body assembly.
PUMP ISSUES
If the vehicle is considered severe duty as in an urban delivery vehicle application, issues may develop with the pump drive components. The 8L90 has a chain-driven pump. Inspect the chain links for stiffness, binding, or damaged links. This indicates possible drive or driven gear wear (Figure 4). The chain, drive, and driven gears need to be replaced as a set. Note, there is a different driven gear for the 8L90 application versus the 8L45 unit.
There is an early and a late pump. The early and late pump interchange as an assembly. The casting for the late pump cover was changed to accommodate an oil jet. The pump cover and the thickness of the gasket used are different as a result (Figure 5). Problems arise when servicing the pump. If the wrong gasket is used, the pump can be damaged on assembly, or you can experience a no-move issue. Always assemble this using hand tools and check the gasket fit to verify.

C4 PISTON FAILURES
Starting in 2018, the C4 (2-3-4-6-8) pistons, seals, and the clutch wave plate were updated. The clutch piston and the clutch dam piston were updated due to cracking issues, while the wave plate was updated to address shift-related issues. A cracked piston will cause 1-2 shift issues and can be accompanied by a DTC P2714 (Pressure Control Solenoid “D” Stuck off).
The updated pistons have deeper and thicker grooves for the seals. When the piston seal bore widths and depths were updated, the seal dimensions were also updated. This means the seals from the early design and later designs are not interchangeable. So it is imperative that you have the correct gasket and seal kit for your application.
When high-tech units begin to fail, it can feel like a SciFi mystery at first glance. After looking into patterned failures with time, these units have similar growing pain issues as earlier units. Always keep the basics in mind, and I will guarantee that you will be able to make sense out of all issues that arise as these units land in your shop. The 8L90’s are here, so be ready!
ΩMore information on updates, problems, and solutions is presented in the ATRA Seminar 2022. Make a plan to attend, and don’t be left behind!