

I recently received a call from a friend, Pat, who runs a transmission remanufacturing company. He was frustrated as he said, “Man, Dennis, we have got these 8L90s that we can’t get to work. It’s like the pump isn’t working. They’ll work fine if they go into gear; otherwise, they’ll just sit there.” He went on to talk about changing valve bodies and other work that they did to fix the problem. Once they got it to engage, it’d work perfectly. After discussing it further, it was clear that the pump wasn’t working. If the pump would pick up oil, it’d work fine. But, if it didn’t, it wouldn’t engage at all, forward or reverse. Almost like the pump was broken. Hmm.

 I asked a couple of tech guys here at ATRA, and sure enough, it’s a big problem. A problem without a solution. They shared some of the measures people have tried, with marginal success.
These are the sort of tech problems I enjoy. Unfortunately, I hadn’t researched much on the unit other than ATRA Technical Director Keith Clark’s article from March of this year. Make sure you read his article before diving into this further.
I started with the pump, which is part of the valve body. It operates by a sprocket and chain, driven by the torque converter (figure 1). It’s tiny by comparison to most pumps and has a couple of interesting features. First, it has a primary and a secondary chamber (figure 2). The primary portion operates all the time, while the secondary part only operates during higher pressure demands. This feature isn’t new; I recall the 4T80 using a primary and secondary pump, which goes back to 1993. It’s fascinating how it works. As cool as this feature is, it has nothing to do with our problem.

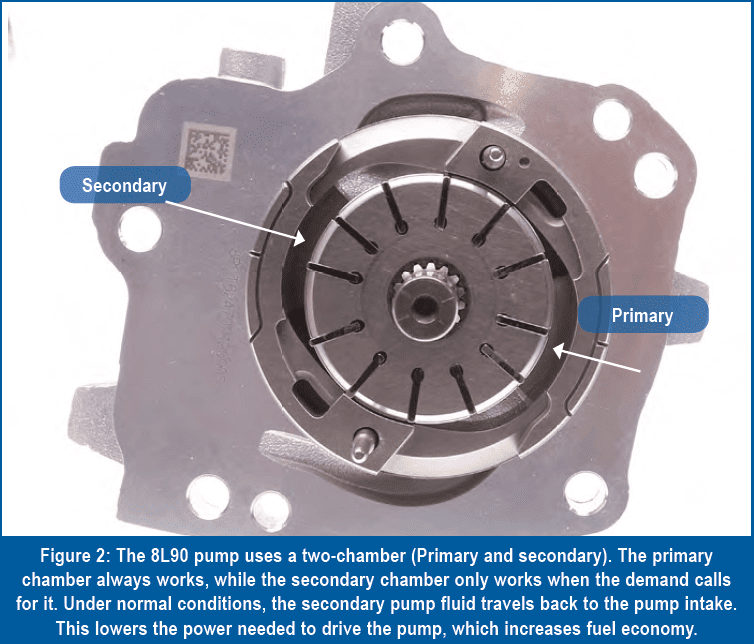 Take a closer look at figure two and see if you find anything odd. Sure, it’s a vane and rotor pump, but notice that it doesn’t have any rings to hold the vanes out. It couldn’t because of the oval design of the housing (GM refers to it as a cam). This means you may have a scenario where the vanes never come out, at which point you have the problem my friend Pat was talking about; it just sits there. But you might think, “Hey, won’t centrifugal force throw them out?” It might. But look again at the photo. Every time a vane goes from the primary side to the secondary side, and vice versa, the cam forces the vane back in. So, it needs something constant to hold them out.


So, what makes this pump work? If you look closely at the pump pressure plate, the pump gasket, and the casting design of the valve body, you’ll notice something interesting; the pump’s pressure gets routed to the center, behind the vanes (figure 3). This explains it. Line pressure that keeps the vanes out and the pump working. If the pump can’t generate just a little bit of pressure, then the vanes may not move out to begin working. In other words, it has to produce some pressure before it produces usable pressure.
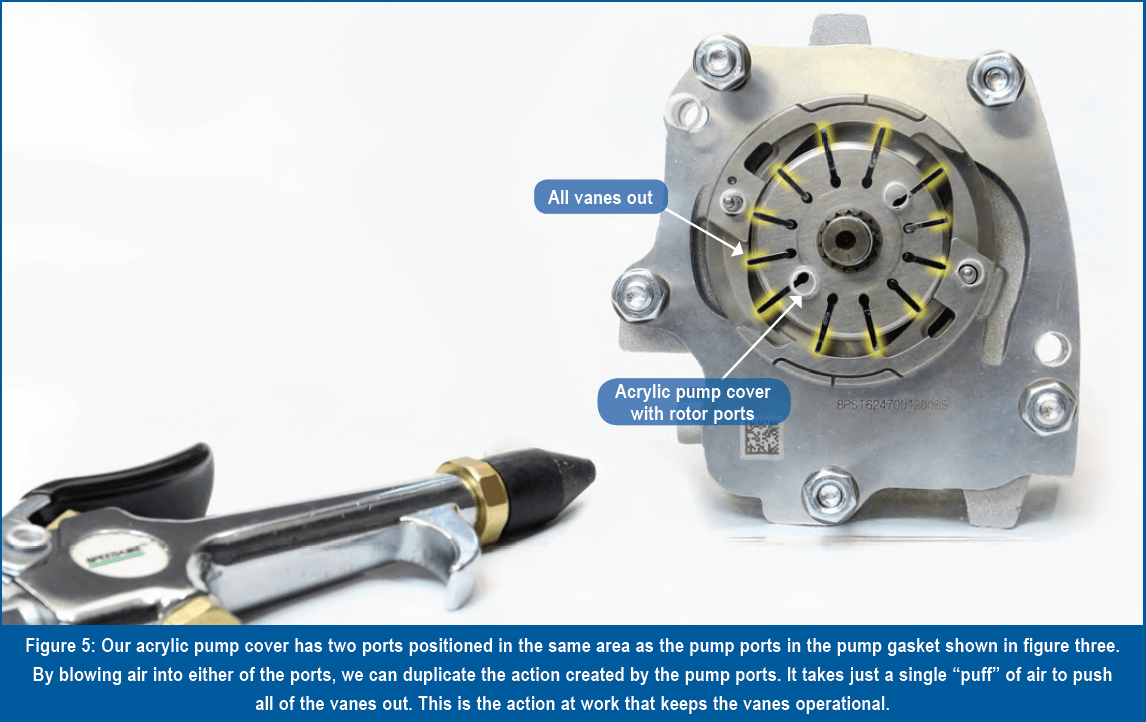
 To explain this further, we’ve set up a jig for a demonstration. Figure four shows the pump with an acrylic plate that serves as the pump cover. Notice the two holes in the plate that access the rotor, similarly to the pump pocket in the valve body. Here, all of the vanes are inward.
We blew air into the rotor cavity in figure five, and poof! Every vane popped out, ready to go to work. We have a video of this demonstration on the GEARS magazine website. Go to the GEARS Overdrive link on the digital version of this article to find it.
 With this in mind, there’s an obvious problem with this pump working after a rebuild. It’s bone dry. So, fill the pump with oil during a rebuild before installing the filter. But there’s more.
When you fill this unit (either in the car or on a dyno), you might be inclined to fill it until it begins flowing out the check plug in the pan. The problem here is that it only sits one inch above the pan rail (figure 6), and the pump is mainly above the fluid level (figure 7). A dry pump of this design, sitting above the fluid level, doesn’t have much chance of working during the first startup.
Here’s something curious: Fully submerging the pump in oil takes a fluid level that’s about 3 ½ inches above the pan rail. And wouldn’t you know it? On the driver’s side of the case is a plug that’s just about there (figure 8).
 It’s not a pressure port. It simply accesses the inside of the case. You have to ask yourself, why would General Motors cast a boss on the case, machine and tap it, and then add a plug to a port that goes nowhere? This is a perfect way to fill the transmission in a way that submerses the pump. Just fill it until fluid dribbles out of that side plug. The pump is now fully submerged. It’ll have a better chance of generating some pressure when you start the engine. If it does, it’ll push the vanes out and begin working. It’ll then pump the oil into the converter and lower the fluid level closer to normal. If you use this approach, make sure you check the fluid level the usual way once you know the pump is working and the transmission goes into gear.
As a side note: GM eliminated that tap later on and raised the fill port to about four inches above the pan rail (not shown). 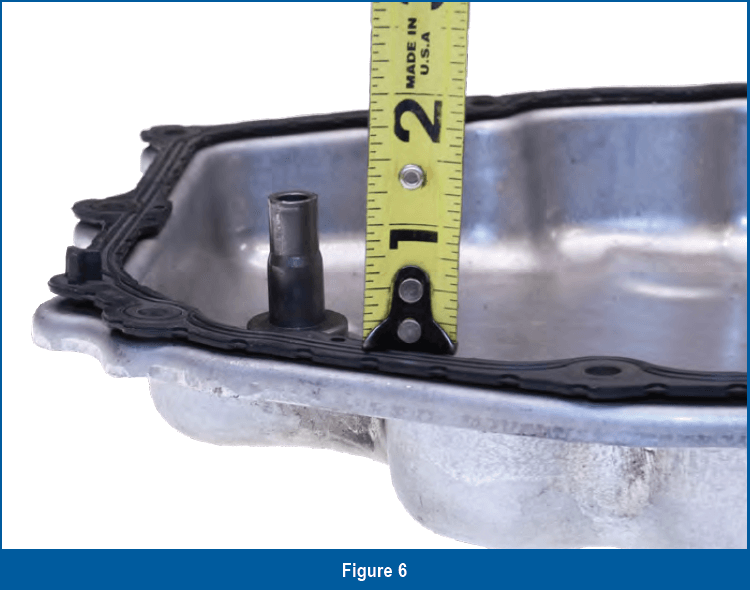 So, examine your case, and either use the side plug as your initial fill level or the fill port, whichever is highest. The point is to get the initial fluid level high enough to submerge the pump fully.
Filling the transmission to this higher level isn’t the best fill approach after a fluid service because the converter is already full, and you’ll have to drain a lot of fluid to get it to the correct level. For this, try option two.
Option two: Use the plug port we just covered or the fluid fill port, whichever is most convenient, and blow just a bit of air into the case (about 25 psi). You may need to use a shop towel to help seal the air nozzle. T his air pressure will force oil through the filter and into the pump. Give it a minute to allow the pressure to escape out the vent before you remove the air nozzle; otherwise, fluid may “burp” out when you remove the air nozzle.. Once you’ve removed the air nozzle, start the engine and check it for engagement. If you wish, you can try this more than once, but don’t run the engine too long with an inoperative pump. This takes me back to years when we’d see a similar pump pickup problem with the 325- 4L. It was a bit messy, but it worked. Note: If you use the fill plug then add an extra step. Stop blowing air into the case and give the case time to de-pressurize through the vent before removing the air nozzle. That way, it won’t belch fluid back out the fill port.
And finally, option three. The Hail Mary. This transmission has two pressure ports near the tail housing (figure 9). The one on the passenger side connects to the pump through the valve body. The idea is to pressurize the tap with oil. You’ll have to fashion an adaptor or rubber nozzle to your oil-fill hose so you can pressurize it without making a mess.  If you use this approach, be patient, the oil has to go through the valve body to get to the pump. And it needs enough pressure to move the vanes out. Once you get a pint through the system, you can replace the plug and fire it up.
So, here’s a recap. Do these steps in order. After each step, start the engine and verify whether or not the pump is working. If not, then go to the next step.
- Fill the unit to 3 1/2 to 4 inches above the pan rail, then start the engine (only after a rebuild, not a service).
- Use low pressure (25 psi or so) to pressurize the case and force oil through the filter and into the pump. Give it a minute, then start the engine.
- Pressurize the line pressure tap (with oil). After injecting about a pint of fluid, replace the pressure tap plug and start the engine.
 There you have it, the Madden Method. There’s no high-tech involved here, just giving the pump a little edge to start, then it’s ready to go.
I want to thank Pat Ayers from American transmissions, who brought this problem to my attention and helped me work through some of it, and Bill Anthony from Roadmaster Powertrain, who helped with some of the tests. Thanks, guys.


